Teaching Mama

playing, creating, and learning at home

Success! Now check your email to confirm your subscription.

There was an error submitting your subscription. Please try again.

facebook twitter pinterest instagram googleplus email bloglovin
  • Home
  • About
    • Disclosure
    • Privacy Policy
    • Meet the Team
  • Contact
  • Toddlers
    • Sensory Play
    • Fine Motor Skills
    • Gross Motor Skills
    • Toys
  • Preschoolers
    • Homeschooling
    • Alphabet
      • Printable Alphabet Packets
    • Fine Motor Skills
    • Gross Motor Skills
    • Math
    • Music
    • Reading
      • Book Activities
    • Science
    • Technology
  • Shop
    • Your Account
    • Cart
    • Checkout
  • Printables Club
  • Member Login

DIY Window Clings

by Angela Thayer 46 Comments

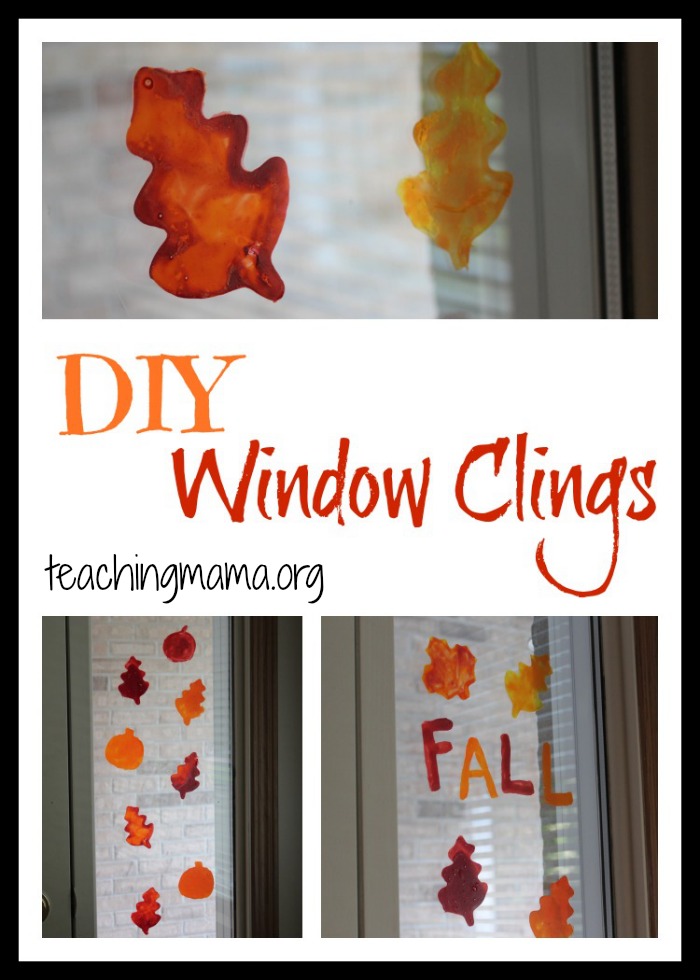
I am so excited to share this new craft with you today! We just created DIY window clings and they are SO easy to make! I can’t wait to share all the details with you. I saw the idea on this site and decided to try it out and put our own twist to the activity. These window clings would be great to make with your preschooler at home or it would be a fun classroom project!

DIY Window Clings

(This post contains affiliate links. See my disclosure page for details.)

Here’s what you need to make your own window clings:

  • 2 Tablespoons of white glue (I used Elmer’s)
  • 2 drops of dish soap
  • food coloring (I used gel food coloring, but you could use liquid food coloring.)
  • plastic page protectors
  • paintbrush
  • cookie cutters (optional)

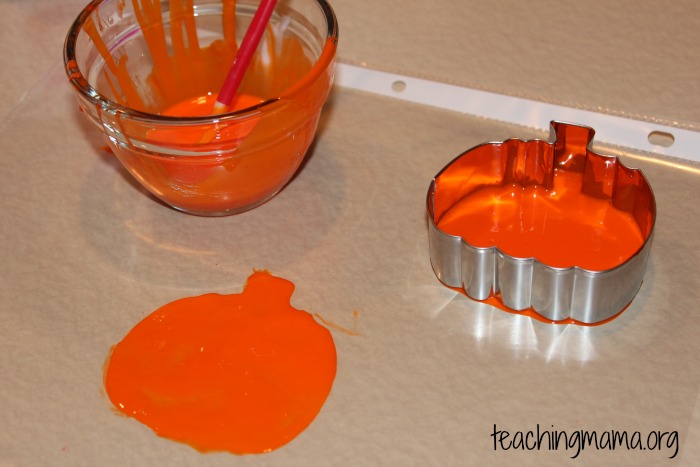
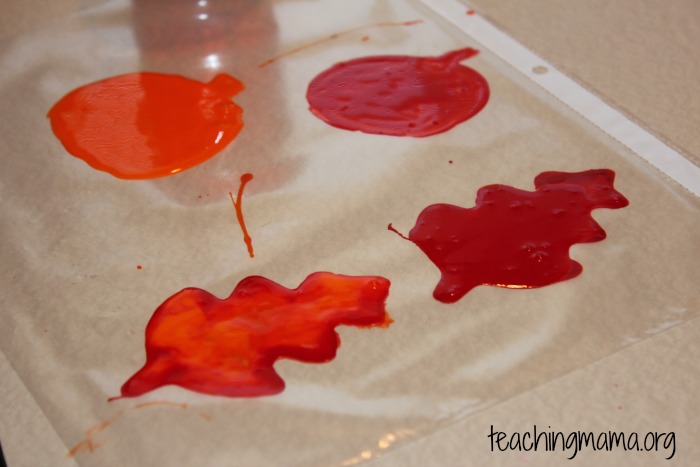
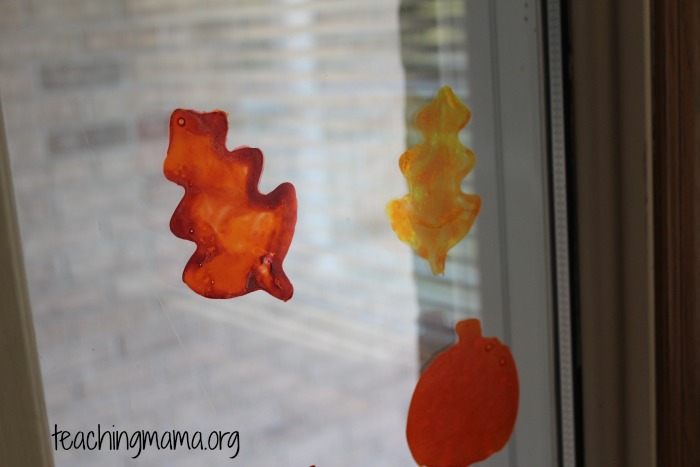
Start by mixing the glue, dish soap, and food coloring together into a bowl. Then use a paintbrush to paint a design on the plastic sheet protector. You can also fill in a cookie cutter with the colored mixture to make it easier. We used fall cookie cutters that I picked up from Hobby Lobby.

DIY Window Cling Paint

You want the design to have a semi-thick layer. If you use too much, the design will run together and won’t dry properly.

Window Clings Drying

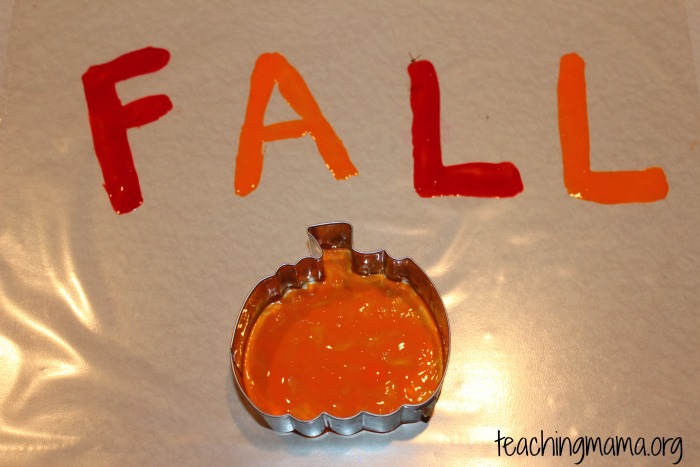
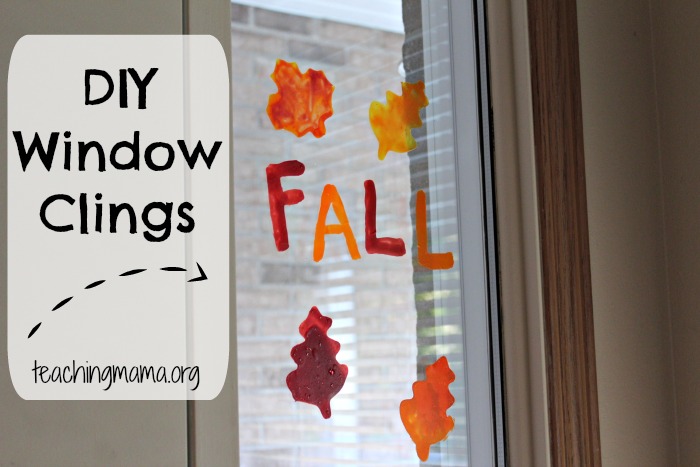
I also wrote out the word “FALL” because I thought it would look nice on our window with our fall leaves and pumpkins.

Fall

You may want to leave the cookie cutter on the design for a few minutes until the glue mixture settles. It helps the design stay in place.

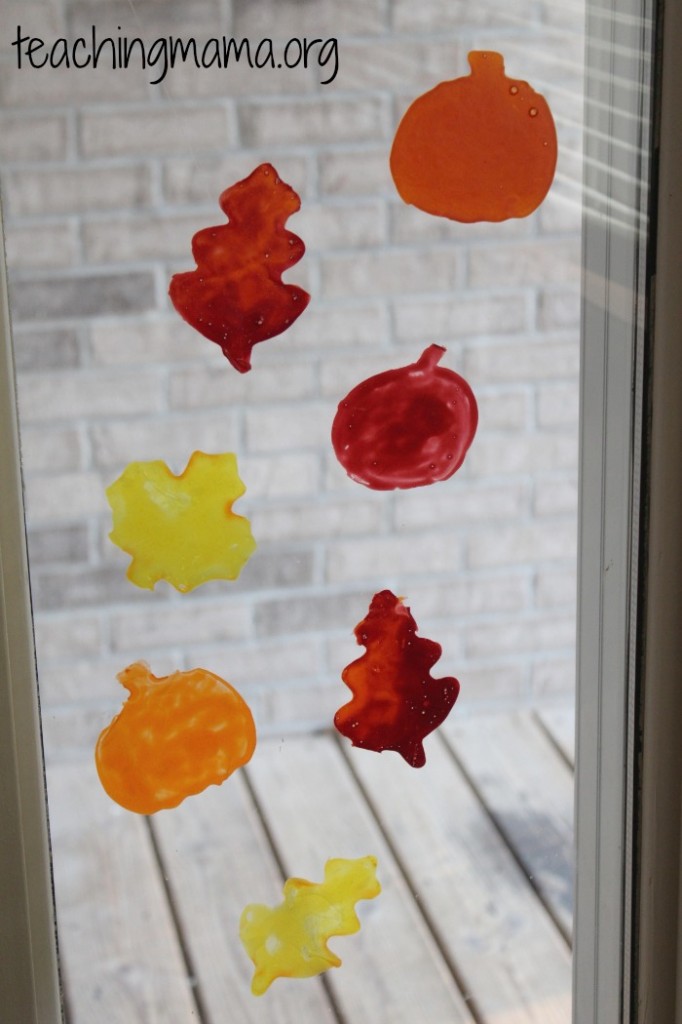
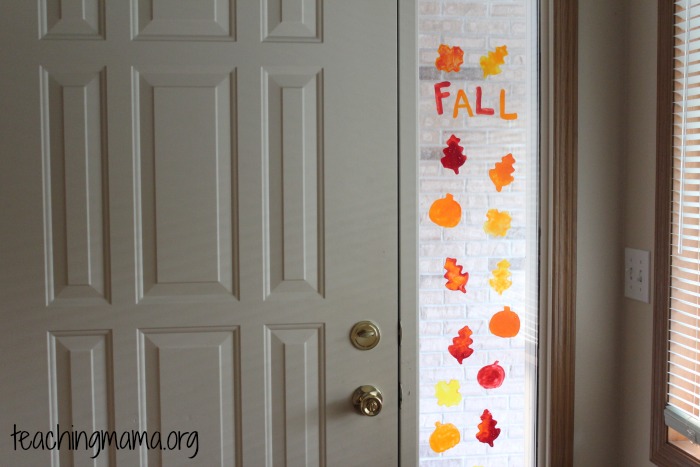
Allow the window clings to dry overnight. Once they feel dry, you can peel them off the plastic page protector and stick them to the window! So easy! They stick very well and can be used for a long time.

DIY Window Clings

DIY Window Clings

Leaf Window Clings

Window Clings for Fall I LOVE how these turned out! They look so pretty on the window. I’m sure we’ll be making these for every season now!

Related Posts

  • Homemade Window Clings for SpringHomemade Window Clings for Spring
  • DIY Christmas Window ClingsDIY Christmas Window Clings
  • 10 Rainy Day Crafts10 Rainy Day Crafts
  • 8 Insect Crafts for Kids8 Insect Crafts for Kids
  • Caterpillar & Butterfly CraftsCaterpillar & Butterfly Crafts
  • 30 Flower Crafts for Kids30 Flower Crafts for Kids

Sharing is caring!

9665 shares
  • Facebook1248
  • Twitter

Filed Under: Crafts, Fall Activities Tagged With: crafts

Comments

    Leave a Reply Cancel reply

    Your email address will not be published. Required fields are marked *

    Recipe Rating


    CommentLuv badgeShow more posts

  1. pearl says

    December 3, 2017 at 1:24 pm

    hi. the idea is adorable and we tried it out, however they arent sticking to the window:(
    Any idea why not?

    Reply
    • Angela Thayer says

      December 4, 2017 at 2:57 am

      I’m sorry! Are you trying it on a cold window? Sometimes cold windows don’t allow the cling to stick. You could also try putting a little water on the cling before sticking it to the window.

      Reply
  2. mikal shone says

    October 30, 2017 at 11:40 am

    first of all i would tell you that these window clings are fabluous in their own term! simply loved this

    Reply
  3. Melody says

    October 9, 2017 at 12:19 pm

    I am wanting to make some cling paper dolls for my granddaughters. I have the clothes to cut out and I was wondering if I didn’t add the food coloring, and painted the clothes with the glue/dish soap mixture if it would work to attach the clothes repeatedly to the doll base. I was also thinking to cover the doll with clear contact paper to attach the clothes to. This probably doesn’t make a lot of sense but has anyone made cling paper dolls and how did you do it? Thanks!

    Reply
    • Angela Thayer says

      October 18, 2017 at 2:59 pm

      I’m sorry I don’t have a good answer since I haven’t tried this. But, I do think that it would work.

      Reply
    • 0Sogood0 says

      April 5, 2022 at 4:06 pm

      Hi so that would work. Haven’t tried myself but I will soon! Thanks for the idea. The only thing is don’t add a lot of clothes to the dolls or they won’t stick because of the weight.

      Sincerely,
      Tina Mills 😎

      Reply
  4. Kimberly says

    August 10, 2017 at 2:12 am

    Do you have any experience with how these hold up or affect windows on a hot day?

    Reply
    • Angela Thayer says

      August 10, 2017 at 7:19 pm

      If it’s hot and humid, they can curl up. If it’s just a warm day, they stay on just fine. I find that very cold weather also makes them not stick well. Hope that helps!

      Reply
  5. Liz says

    July 9, 2017 at 8:52 pm

    Would laminating sheets or aluminum foil shiny side up work as well?

    Reply
    • Angela Thayer says

      July 10, 2017 at 2:35 am

      Laminating sheets would work, but I don’t think foil would.

      Reply
      • Phr3380rn says

        October 24, 2017 at 9:27 pm

        Foil worked for me

        Reply
  6. J Christy says

    December 28, 2016 at 6:26 am

    Just a guess, but those who experienced a runny mixture: did you use Elmer’s glue, or school glue? The non-toxic “school Glue” is much thinner than Elmer’s glue, and could be the reason for the difference.

    I’m getting ready to try this with my after school program–I can’t wait to see the results!

    Reply
  7. Dannica Gordon says

    October 24, 2016 at 4:26 pm

    I did this for halloween. I dyed it red and did “bloody handprints”. I used liquid food coloring and page protectors, so I had no problem getting them off. They were also no problem to take off and restick.Thanks so much for the idea!

    Reply
    • Angela Thayer says

      October 24, 2016 at 7:08 pm

      What a cool idea! Thanks for sharing what you did!

      Reply
  8. PATRICIA says

    September 29, 2016 at 1:26 am

    LOKE YOUR CLINGS JUST MADE SOME UP I USED EXACTLY WHAT YOU DID BUT USED 2 DROPS OF REGULAR FOOD COLORING ITS SO THIN AND YOU CAND DRAW WITH IT
    AND I DID THE EXACT MEASUREMENTS I USED DAWN DISH SOAP BUT DONT THINK THAT WOULD MATTER JUST CURIOUS WHY ITS SO THIN AS I NOTICED SOMEONE ELSE COMMENTED ABOUT TAHT COULD YOU LET ME KNOW REALLY LIKE YOUR CLINGS
    SO THEN I DID ONE IN A COOKIE CUTTER DO YOU HALF TO PUT ALOT IN THAT
    COOKIE CUTTER WANTED TO PAINT A PICTURE SO BAD BUT ITS TO RUNNY PLEASE LET ME KNOW I RALLY LIKE YOUR CONCEPYT ETC

    Reply
    • Angela Thayer says

      September 30, 2016 at 2:45 am

      I am SO sorry for the disappointing turnout. 🙁 My guess is to add more glue to make it thicker. I would also coat the inside of the cookie cutter with a thick amount of the mixture. Hope that helps!

      Reply
  9. Jeff says

    September 16, 2016 at 1:17 pm

    Great project that worked out well. Made a batch with kids and tested a small amount on various papers. As others noted, plastic bags or sheets and shiny side of freezer paper worked, parchment and wax paper did not.

    We split up a batch into 6 colors and used 2 drops of gel food color in each. Colors were very dark and great to use. That would be 12 drops for a full recipe.

    2 things to watch out for. Any bubbles in your work end up showing as white (empty) spots once the clings are done and out on a window. They don’t bother us much but are very noticeable.

    2nd is that if you are layering or mixing colors, what you see while painting the clings is not what you get when they dry. The layers all blend together and the darkest one is all that you see. As an example, when wet, a yellow eye on a black cat stands out well and looks great. When dry, it is almost impossible to see that there was any yellow at all. So if you plan to add shadows or highlights or do similar mixing effects, be aware of this.

    Reply
  10. Kay says

    December 4, 2015 at 2:55 pm

    How cute would these be uncolored for a frosty snowflakes or faux icicles effect? The only issue with that might be that because those are more line based instead of solid shapes they might be more fragile.
    Just tried the hot glue version (from pinterest) and they didn’t cling at all-might have to do it directly on the windows for that. Not all lost though, a little shimmer paint and glitter turned a fail into super cute (and cheap!) ornaments

    Reply
  11. Christina says

    July 8, 2015 at 2:04 pm

    How do u store these? And do they restick over and over?

    Reply
  12. Marianne says

    March 25, 2015 at 12:36 pm

    My granddaughter and I made these and turned out great….however I put them on window for her to see results, then removed for her to take home, but now they won’t re-stick !! Any ideas??

    Reply
    • Krystelyn Morishita says

      October 16, 2016 at 9:29 pm

      You can add a tiny bit of hot water to the. Back of the cling and it will restick.

      Reply
  13. Jill says

    March 9, 2015 at 3:43 pm

    I tried these last night and wanted to report that freezer paper (the shiny side) works well as a surface for these. Thanks for the fun idea!

    (Aside: freezer paper is great for DIY fabric stencils, too! Cut out your design by hand or using a Cricut, Silhouette, etc. Iron (shiny side down) to fabric, paint, let dry & peel off.)

    Reply
    • Angela Thayer says

      March 10, 2015 at 2:43 am

      Awesome tips! Thanks for sharing!

      Reply
  14. Candi says

    December 2, 2014 at 1:49 pm

    I was really excited to give this project a try. Somehow I left out the dish soap. I used liquid food coloring and wax paper. They didn’t work for me. Though not any fault of yours. I didn’t properly follow the directions. I see from others that wax paper didn’t work for them either. I will try these again, I have lots of glue leftover. This time I will follow all directions. Fingers crossed they turn. I think its such a cool idea.

    Reply
    • Angela Thayer says

      December 3, 2014 at 12:42 am

      I’m glad you’ll try it again!! Yes, the dish soap is an important ingredient! I just made another batch last night and I used liquid food coloring and it worked great. I haven’t tried it on wax paper, but I know it works well on the plastic sheet protectors. Good luck!

      Reply
  15. Victoria says

    October 8, 2014 at 11:40 pm

    What a great idea! I remember doing something similar as a kid but hadn’t thought to try it with my own!
    Victoria recently posted…Third Day of Creation ActivitiesMy Profile

    Reply
  16. Christi says

    October 5, 2014 at 1:23 pm

    Can you pour it out in a big sheet and the cut your shapes out?

    Reply
    • Angela Thayer says

      October 5, 2014 at 6:10 pm

      That’s a great idea. I have not tried that, but I would assume it would work.

      Reply
  17. Jessica says

    October 3, 2014 at 11:21 pm

    I tried this today with my students but they do not look as dark or thick as yours. I tried the cookie cutters but when they dry they are almost clear. Do you know what I did wrong? Thanks!!

    Reply
    • Angela Thayer says

      October 5, 2014 at 6:08 pm

      I’m so sorry it didn’t turn out for you! Did you use liquid food coloring? I used gel food coloring, so I think it maybe made it thicker. I would try adding some more glue to make it thicker.

      Reply
  18. Lindsey Palensky says

    September 30, 2014 at 6:03 pm

    Could you use wax paper or parchment paper instead of page protectors?

    Reply
    • Angela Thayer says

      September 30, 2014 at 8:39 pm

      The page protectors are a bit thicker and lays flat, which is why I used them. I have not tried using wax paper or parchment paper, but I would think it would work. Good luck!

      Reply
      • Kristine Griffin says

        November 30, 2014 at 1:43 am

        What about using freezer bags? I would assume they would have the same thickness and durability. I will try this and let you know!

        Reply
        • Angela Thayer says

          December 3, 2014 at 12:43 am

          You could try it out. I haven’t tried it, so I don’t have any experience with it. Sorry!

          Reply
      • All1Naturalliving says

        November 16, 2018 at 9:55 am

        I used baking paper = disaster struck. The paint glue mix started going through and wrinkling the paper. I then used freezer bags that were quite thick and now I am waiting for it to dry overnight, no wrinkilng.

        Reply
    • Alyssa says

      October 22, 2014 at 7:32 pm

      I tried this yesterday and used waxed paper…. it didn’t work for me. The clings seemed too dry and therefore were not sticky. I don’t know if my mixture was off (when I tried to put in 2 drops of dish soap, a bit more came out) or if the waxed paper absorbed the mixture. If I try this again, I will use the plastic page protectors.

      Reply
      • Alyssa says

        October 22, 2014 at 7:34 pm

        Oh, and I also used the liquid food coloring because I don’t have the gel.

        Reply
      • Angela Thayer says

        October 28, 2014 at 3:23 am

        I am so sorry it didn’t turn out for you!! I’m guessing the wax paper was the problem. I’ll try making some with liquid food coloring to see if that may be a problem, too!

        Reply
    • Ally says

      February 29, 2016 at 10:30 pm

      I tried with wax paper and the glue kind of absorbed into the paper and wouldn’t peel off. I switched to page protectors halfway and those worked much better!

      Reply
  19. Christie @ Practical Princess Diaries says

    September 30, 2014 at 3:50 pm

    I love this idea. I can’t wait to make these with the kids. I agree this is a great idea for all the holidays. Thanks for sharing this fun tip!
    Christie @ Practical Princess Diaries recently posted…Easy Oven French FriesMy Profile

    Reply
  20. Susen @ Dabbling Momma says

    September 30, 2014 at 2:08 am

    I’m so glad their’s a post about DIY window clings cause my daughter and son both love sticking them onto our front and back doors. I just bought some at Michael’s this past weekend but they’re not cheap and they asked for more but till now that wasn’t going to happen. Now we can make our own and we have lots of fall cookie cutters! Can’t wait to give this a try!! Pinning!
    Susen @ Dabbling Momma recently posted…Toilet Paper Roll GhostsMy Profile

    Reply
  21. Stacie says

    September 29, 2014 at 1:56 pm

    These are awesome! I have got to try these with my daughter this week. Going to pin this so I can come back to it later.
    Stacie recently posted…Painting is Relaxing – My results to Hart Party Spring Blossom TutorialMy Profile

    Reply

Trackbacks

  1. Autumn Leaf Suncatchers - Clare's Little Tots says:
    September 22, 2015 at 11:59 am

    […] these simple DIY fall leaf window clings from Teaching […]

    Reply
  2. Presenting Portrait of an Adoption’s most amazing list of activities to do at home with sick kids. | The Next Family says:
    March 12, 2015 at 9:50 pm

    […] your own Window Clings, using a kit or diy. Put puff paints on new tube socks to use as new slippers for the next […]

    Reply
  3. 101 Activities for Kids to Do at Home - The Ever Eclectic says:
    February 25, 2015 at 3:44 pm

    […] 91. Make your own window clings. […]

    Reply
  4. Over 60 Activities To Do At Home With Sick Kids says:
    February 6, 2015 at 3:22 am

    […] your own Window Clings, using a kit or diy. Put puff paints on new tube socks to use as new slippers for the next […]

    Reply
about teaching mama
sensory play crafts printables fall winter spring summer

Search Teaching Mama

Archives


Copyright © 2023 Teaching Mama · Privacy Policy · Disclosure

Copyright © 2023 · Teaching Mama on Genesis Framework · WordPress · Log in

9665 shares
  • 1248

We are using cookies to give you the best experience on our website.

You can find out more about which cookies we are using or switch them off in settings.

Teaching Mama
Powered by  GDPR Cookie Compliance
Privacy Overview

This website uses cookies so that we can provide you with the best user experience possible. Cookie information is stored in your browser and performs functions such as recognising you when you return to our website and helping our team to understand which sections of the website you find most interesting and useful.

Strictly Necessary Cookies

Strictly Necessary Cookie should be enabled at all times so that we can save your preferences for cookie settings.

If you disable this cookie, we will not be able to save your preferences. This means that every time you visit this website you will need to enable or disable cookies again.

Cookie Policy

More information about our Cookie Policy